FAQs
Frequently Asked Questions about this wiki and animation art collecting in general.
- Vinegar Syndrome: What is it and why should I care?
- Cel Pricing
- How to Read a Timing Sheet
- Framing, the right and wrong way to do it.
- Quick Guide to Types of Non-Production Animation Art / Cels
- How to Spot a Fake
Vinegar Syndrome: What is it and why should I care?
|
|
 |
Before and after images of a cel affected by Vinegar syndrome. This cel is from She-Ra: Princess of Power (1980s).
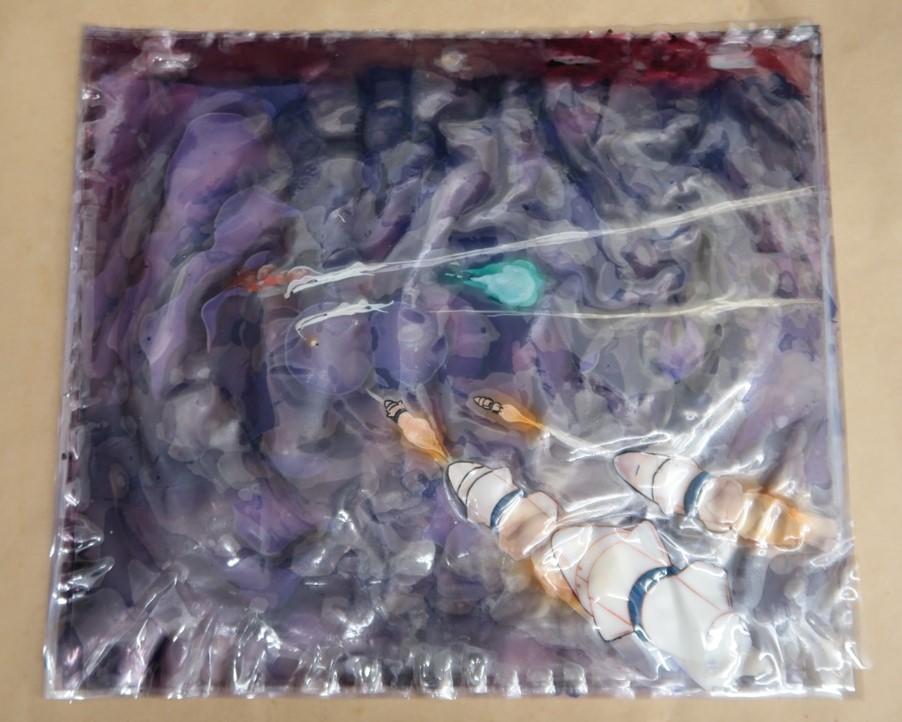
Vinegar Syndrome is something every animation art collector should be aware of. It is a condition where the cellulose nitrate/acetate the cels are made of begins to break down, releasing fumes with the distinct smell of vinegar.
Unfortunately, animation cels were not made to last. Many studios would discard cels once production was complete, or wash the paint off of them so the cels could be reused. They only needed to last enough to be filmed, were never meant to be archived, and are not chemically stable. However, with proper care it is possible to prolong the lifespan of animation cels.
SIGNS OF VINEGAR SYNDROME / CEL DETERIORATION
- Vinegar smell (it can be faint or very strong)
- Warping/rippling of the acetate surface
- An "oily" liquid, usually present between cel layers
- Grainy/salt crystal like deposits on the cel.
It is very important to note that Vinegar Syndrome is CONTAGIOUS. Affected cels will release acidic fumes which may cause nearby cels to also begin to deteriorate. Any cels showing signs of Vinegar Syndrome should be immediately isolated from other cels. Ideally Vinegar Syndrome affected cels should be placed as far away from healthy cels as possible. Unfortunately, it is not currently known how to stop Vinegar Syndrome once it sets in.
 |
 |
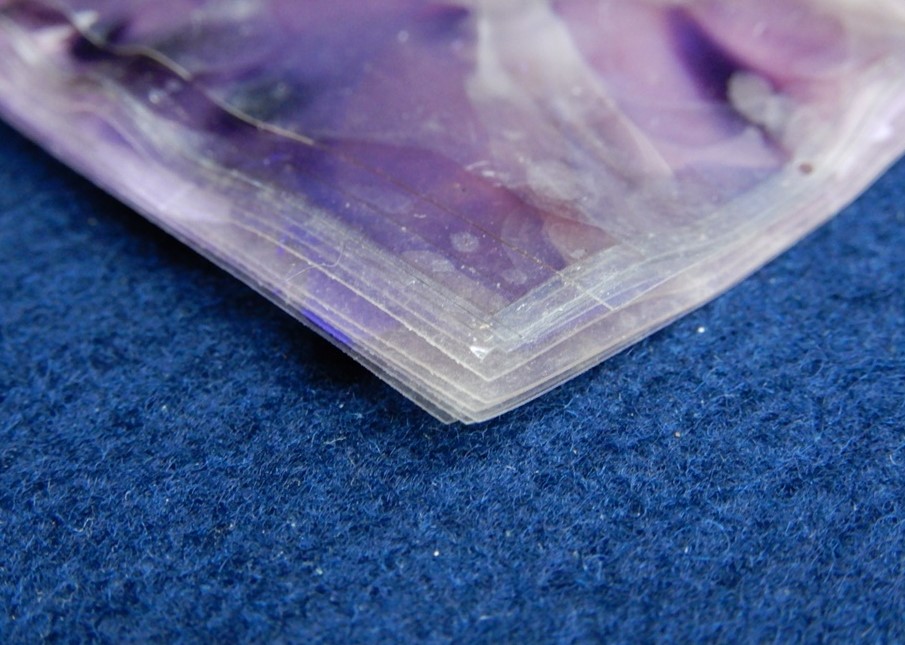
This cel shows early signs of Vinegar Syndrome. It has minor warping/rippling in the marked areas and a faint vinegar smell. The second image shows a close up of the ripples. A cel in the beginning stages of Vinegar Syndrome should immediately be aired out and separated from the rest of the collection.
 |
 |
Examples of cel warping/rippling, indicative of vinegar syndrome.
 |
 |
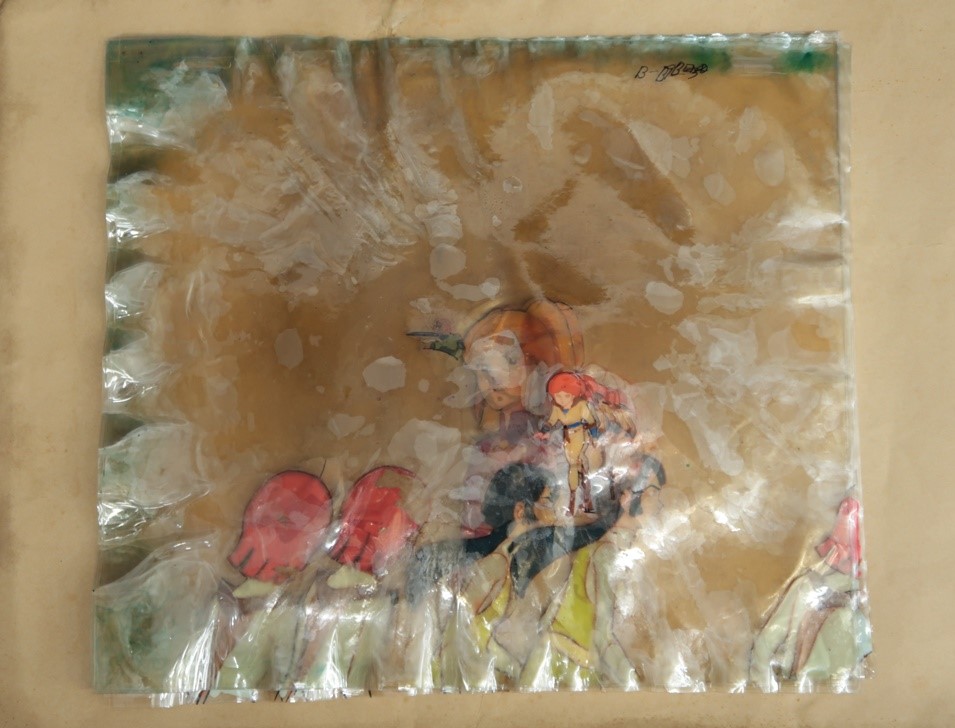
Examples of Vinegar Syndrome cels exhibiting grainy/crystal-like deposits. It is not known how to stop or remove this type of damage once it has occurred.
 |
 |
 |
 |
Examples of cels with severe vinegar syndrome damage.
Cel Pricing
How much should I pay? And why?
This topic is very personal and there is no "right" answer. The value of an animation piece is based on many factors. Below is a list of some of the things that can impact prices and should be kept in mind when hunting for your next purchase.
- Series Popularity - Pricing can change depending upon the popularity of the series at the time of the sale. For example a few years ago as early as 3 Card Captor Sakura was selling at bargain basement prices. Now cels are commanding premium prices on the market due to the release of the new series and it's popularity in China.
- Scarcity of the Artwork - For years the only way to get Evangelion was to purchase it from people who had smuggled it out of the studio. Until one day the studio dumped the entirety of their Evangelion vault on the market, so before this happened artwork was only available in the $1000s, after the dump happened prices went down for a bit, and then went back up once the market dried up.
- Quality of the Cel - Is the cel of a stick figure, or is it a beautiful 3/4 face short with shimmering eyes. While Cel quality is always personal thing, the look of it can of course drive up the price.
- Character - As silly as it sounds Character Tax is definitely a thing certain characters will drive up the price of a character, heck even certain versions of a character, a good example of this is the difference between Vegeta and Majin Vegeta, Vegeta on a normal day at worst is usually around $200 (this can change of course based upon other factors as well of course), Majin Vegeta usually will come to double that and sometimes even more than that.
- Scene/Recognizability - The more recognizable a scene the cel is from the higher a price it will command. This applies to multiple types of scenes including OP/End and even Eyecatches, how recognizable is the scene to even a casual fan? This definitely drives up the price.
- Condition of the Cel - How bad is the line fading (is it comparable to other cels of the era)? Is there any buckling or bubbling in the acetate? Is it stuck to the sketch? Is there paint loss? Are the matching background and sketch work behind the image included with it? (This one can hugely drive up price) If it is in pristine condition, this will affect the overall price of the cel as well.
All of these things can affect pricing and it is ultimately up to you how much you are willing to spend on a particular piece. On top of the above factors you should always research the more recent sale prices for a series to give you an idea of what a particular market is like. Go to auction sites and check sold auctions in your series, if the cel is well above these recent sales ask yourself what you are willing to pay.
Another thing to keep in mind is that you should remember that cels are generally a sunk cost there is no money in them if you are looking to get paid in the end this is not the hobby for you. When people are getting out very rarely do they make any money on their previous treasures. Keep that in mind when you are budgeting for this at times fun, at times rewarding, at times frustrating hobby!
How to Read a Timing Sheet
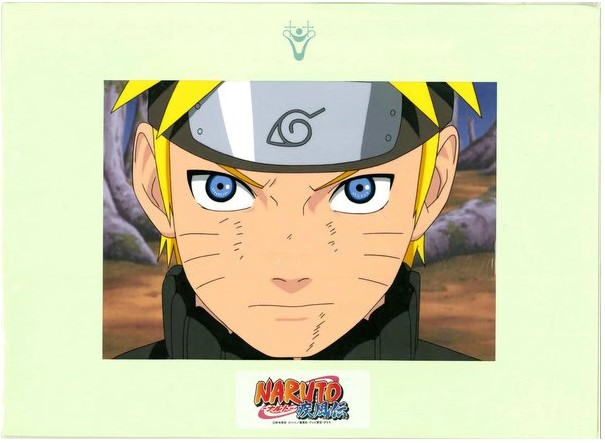
Timing sheets can be difficult to read and might look like a different language at face value. In this guide, we'll look through two examples of increasing difficulty from the hit series Naruto. By the end of the guide, hopefully you can get a feel for how timing sheets work and an increased appreciation for the animation process.
Note that Naruto was created past the reign of cel animation; however, the animation process remains the same and the use of timing sheets is universal. In classic cel animation, pencil drawings (douga) are used to paint cels which are then arranged and photographed according to the timing sheet. For Naruto, pencil drawings are uploaded and painted using computer software, and then arranged according to the timing sheet. There will be a video of making Naruto the Movie at the end of the guide so you can see this in action.
Example 1
Let's begin! For the first example, we'll see Kakashi come to life so he can kick some butt. The end result will look something like this:
Kakakashi douga animated with the approximate timing that the series used. Apologies about the watermark.
We'll start off talking about the timing sheet:
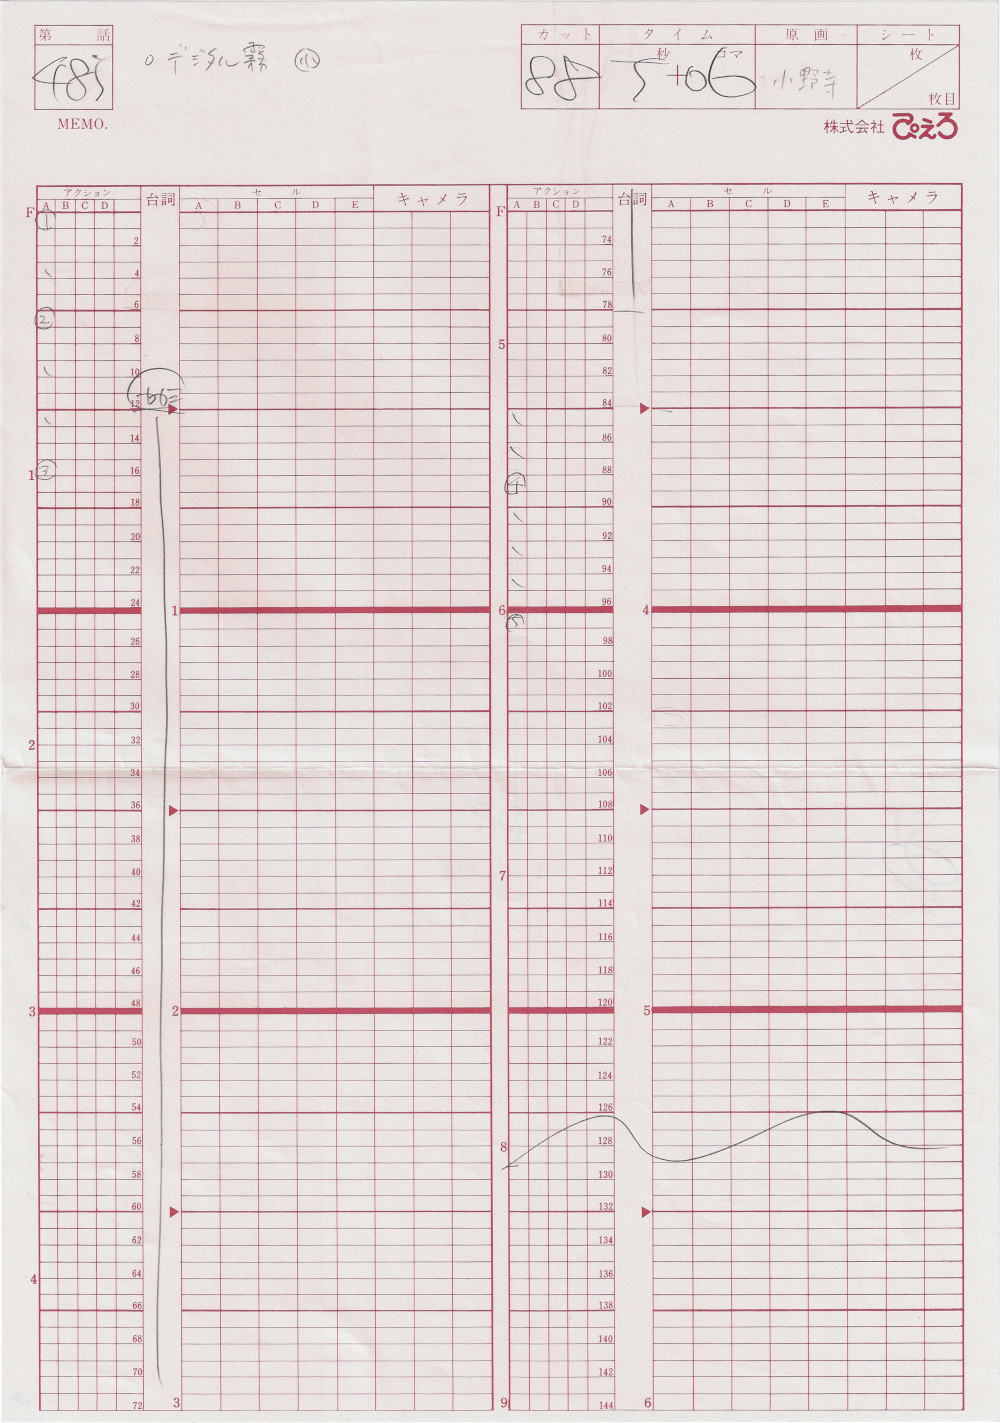
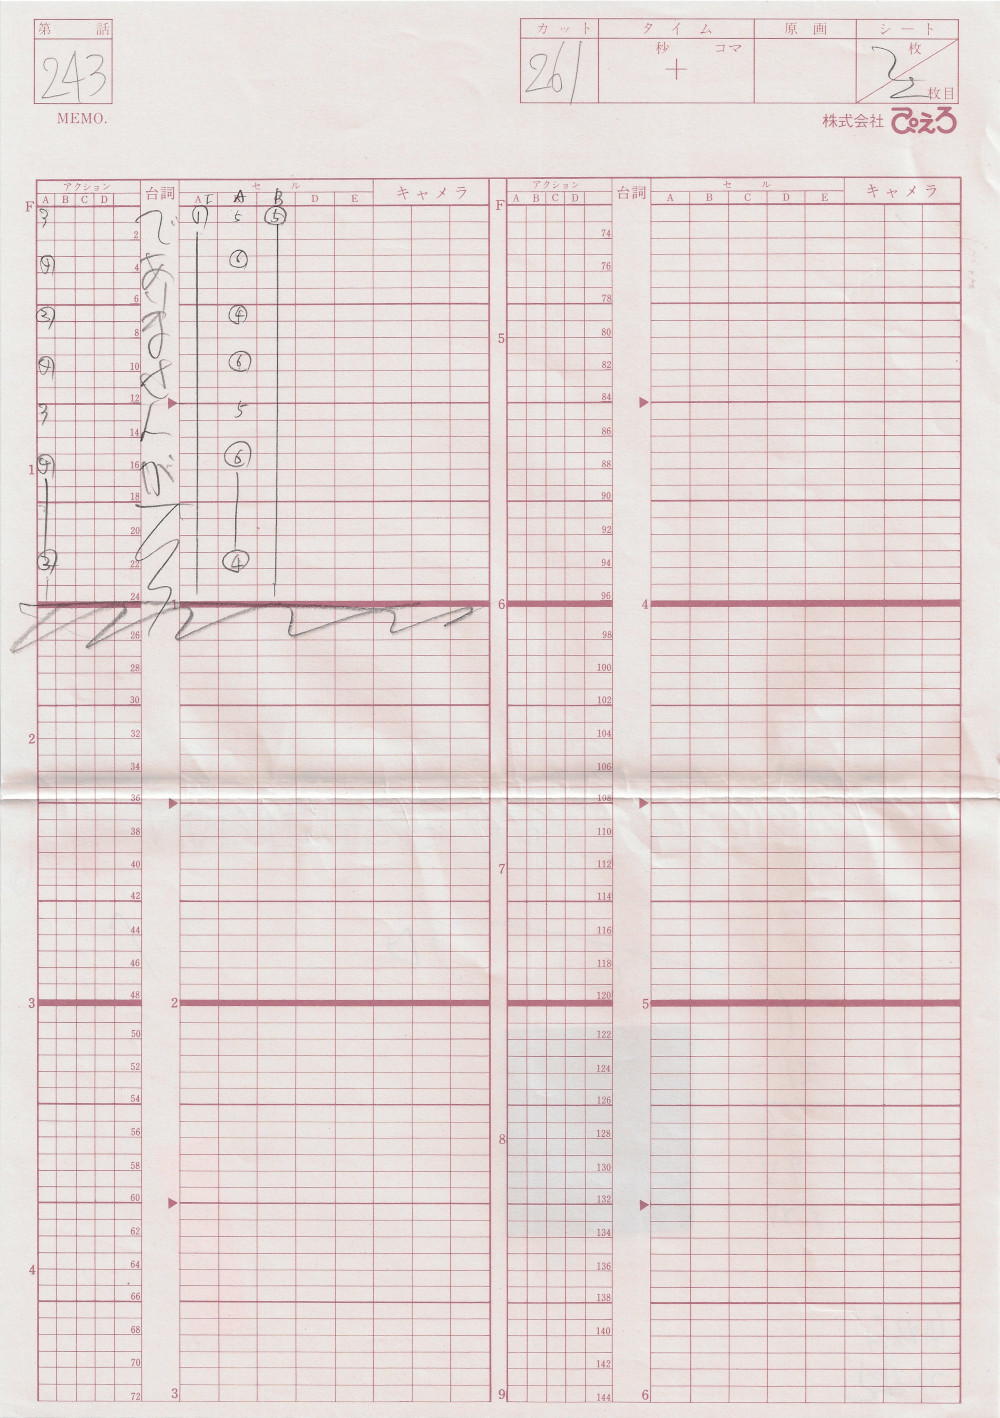
Timing sheet for the Kakashi sequence
Let's take a look around the sheet before diving in. The first thing you'll see is is the 485 in the top left - the number in this area corresponds to the episode number. The 88 to the right corresponds to the sequence number (also called a cut number). Timing sheets are created per sequence; one sequence corresponds to one background being used (storyboards have the same correlation and timing sheets are linked to storyboards by their sequence number). Further to the right is a 5+06, which corresponds to the total time for the sequence (5 seconds plus 6 frames).
Further down will be the guts of the timing sheet. Some things that should catch your eye:
- The columns are annotated with A, B, C, and so on.
- There are some boxes with some tick marks and circled numbers
- Some of the boxes in the right of the column on the left are annotated with numbering 2, 4, 6, and so on
- There are solid red lines sectioning off areas of the smaller boxes
- The solid red lines have 1, 2, 3 and so on in the middle
- There are actually 2 sets of 2 columns here that repeat
The first thing to understand with timing sheets is that animation is done in 24 frames per second. This means that for every second of animation you watch, there are 24 frames that appear to make a fluid video. Each row of the smaller red boxes corresponds to one of these frames. The dark red lines actually section off 1 second of real-time video. Confirm this by looking at the timing sheet again; you will notice that next to the row of small red boxes that have the label 24, the label 1 is on the dark red line; next to 48 is 2, and so on - all the way to the second set of columns with 144 next to 6. This brings us to the first takeaway from this lesson:
Takeaway #1:
- Each row of small red boxes corresponds to one frame of animation
- One frame of animation is 1/24th of a second of real-time video
- Each dark red line cordons off 1 second of real-time video
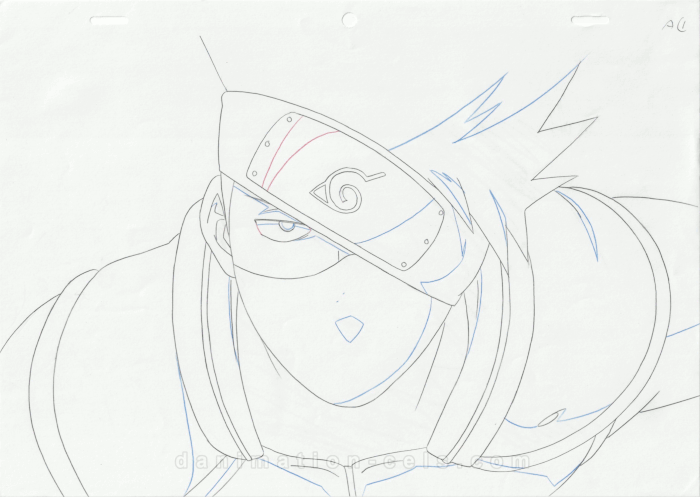
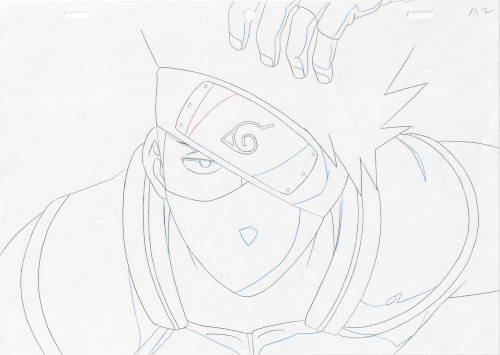
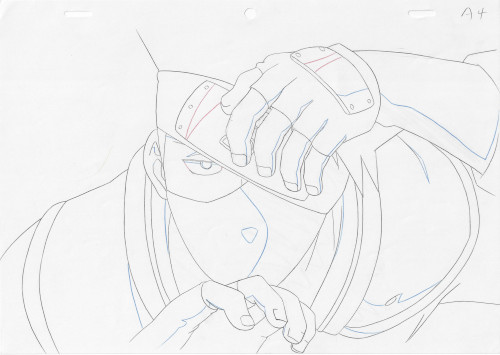
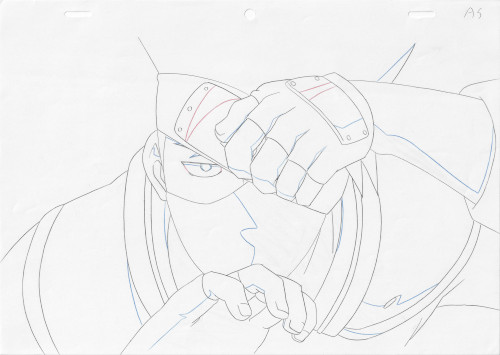
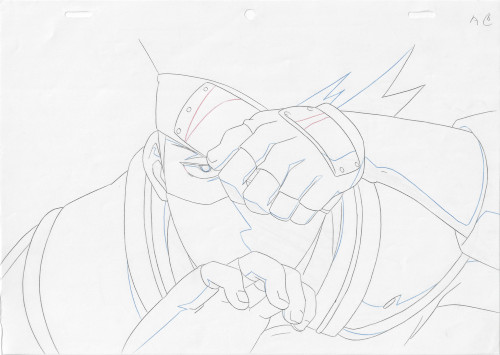
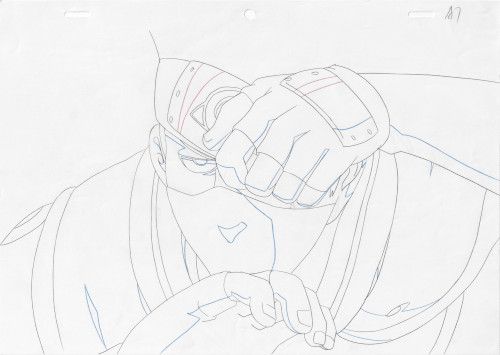
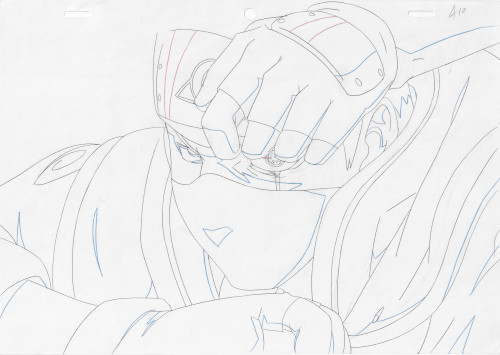
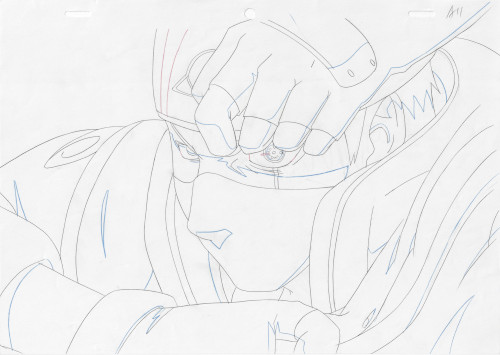
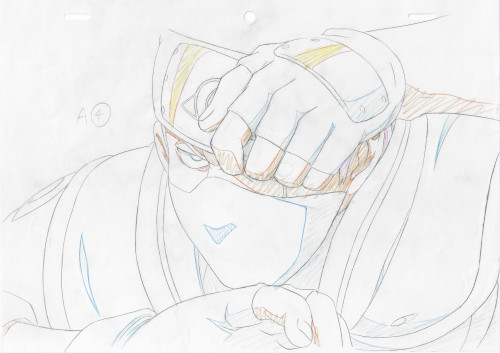
At this point, you need an idea of the animation materials used. Genga is used to depict the key frame and douga are the pencil sketches used for the actual filming. Here is the douga that was used for this sequence (open in new tab for better picture):
 |
 |
 |
 |
 |
 |
 |
 |
 |
 |
 |
 |
 |
The douga (actual frames) used to make the sequence
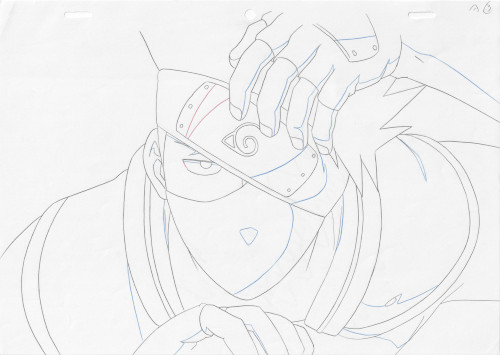
And here is the genga:
 |
 |
 |
 |
 |
Genga (key frame sketches)
So, back to the timing sheet. Let's looks at the columns. There are 4 columns - 2 sets of 1 slimmer column and 1 fatter column. Normally, the slimmer column denotes the key frames (better seen in the second timing sheet example), and the fatter column corresponds to the douga used. In this timing sheet, the person who made it decided just to use one column. There's only one layer here so apparently it was deemed unnecessary.
You should see an A, B, C and so on - this corresponds to the layer that the timing is dictating. The A layer is the layer that is closest to the background (usually) and subsequent layers are closer to the audience in alphabetical order (if there were 4 layers, then the D layer would be at the very top). This example is easy because there is only one layer.
Next, the boxes themselves. You should notice that some boxes have numbers circled in them and some of them have a dash mark. Either of these marks represents a new douga being used. The circled numbers correspond to a key frame and the dash marks correspond to inbetweens (the key frame douga have circles around the number as well). The sequence, reading top to bottom, looks something like:
| 1 | dash | 2 | dash | dash | 3 | dash | dash | 4 | dash |
and so on. Remember that this is 2 sets of 2 columns, so to continue from the bottom, look to the second set of columns (which looks like column 3). For the actual douga that is used, this will correspond to:
| A1 | A2 | A3 | A4 | A5 | A6 | A7 | A8 | A9 | A10 |
This means that A1, A3, A6, and A9 correspond to key pieces of the animation (A13 is the 5th key animation but not able to fit into the table) while A2, A4, A5 and so on correspond to the inbetweens. You can see the douga lineup with the genga (key animation) here, noting that the A1 key frame corresponds to douga A1, A2 key frame with douga A3, A3 key frame with A6, and so on:
Genga (key animation) |
Douga (animation used) |
|
A1 key frame drawing |
A1 douga |
|
A2 key frame drawing |
A3 douga |
|
A3 key frame drawing |
A6 douga |
|
A4 key frame drawing |
A9 douga |
|
A5 key frame drawing |
A13 douga |


Douga and genga next to each other
Remember: each small box corresponds to 1 frame and 1/24th of a second of real-time video. So the sequence started off with a new animation every 3 frames (and 3/24th of a second), holds the A6 for a while, and finishes off with a new animation every 2 frames (and 2/24ths of a second).
Lastly, the solid line drawn straight down means hold that frame. The squiggly line in the last box means that the animation stopped before that time (this sequence is 5.25 seconds long as 6 frames is 1/4 of a second in real-time).
So this brings us to the second takeaway:
Takeaway #2:
- The left-hand slimmer column normally denotes the key frames and the right-hand shows the actual douga used. However, this convention was not followed for this timing sheet since it was only 1 layer.
- The A, B, C etc. columns correspond to the layer for that frame.
- The numbers and dash marks correspond to a different douga (or cel) being used for the shot.
- Key animation frames have their number circled in the timing sheet
- Inbetweens are represented as dash marks.
- For the sake of counting for the douga, each mark represents a +1; so for the circled 1 and then the next marking being a dash, the dash corresponds to douga A2. The following circled 2 actually corresponds to douga A3.
- Not all of the timing sheet is used, and the sections not used are marked off.
Finally thoughts about this example:
- The convention that each mark represents a +1 in the douga is not normal; usually the fatter column explicitly calls out the douga number. It is not always incremented; for example, during a talking sequence (below), several frames can be reused back and forth to mimic talking. This odd behavior is a consequence of only the key frame column being filled in and the sequence being linear.
- It's still a solid example on how to read a timing sheet; different timing sheets might need to be read in a different way.
And that should wrap up this first example! The douga is uploaded in order, has color filled in, and is then timed according to the timing sheet. For cels, the same applies - the cels are colored, photographed, and arranged according to the timing sheet. Unfortunately the computer program used to make the gif cannot use the exact timing, but the gif is roughly in proportion to what the timing of the actual animation would have been. This example should have given you a good understanding of some of the basics of timing sheets.
Example 2
Next let's step up the difficulty and look at a 3-layered shot of Sakura talking:
**Edit ahhh it's too big. it's this image: https://danimation-cels.com/images/naruto/sakura-set-2/sakura-2-gif-small.gif sorry I will figure out how to get that on here
So what does a timing sheet look for something like this? Trick question - there's actually 2 of them:

A little more difficult than the first one.
The good news is that this timing sheet abides by the same rules as the first one:
- Each timing sheet is 6 seconds.
- Each box is 1 frame, 1/24th of a second, and the solid red lines section off 1 second.
- The left-hand slimmer column denotes the key frames.
- The right-hand fatter column corresponds to douga.
- The columns A, B, C etc denote the layer.
Another oddity with this timing sheet is that there's an additional layer on the timing sheet. It's a static layer. For the sake of this exercise, we will focus on just the A/B layers. I will not mention the C1 layer, but keep in mind that it is there throughout the entire sequence. I believe that this layer is a top layer, however for the sake of the gif, it was put in the back. Without going back through and confirming, just assume that this back layer was supposed to be in the front.
At frame 1, only the A1 douga is there. You can see in the left-hand column that this corresponds to the A1 key frame, and the right-hand column actually shows 1 under the A column. A2 is at the 4th frame and A3 at the 7th frame. These are inbetween frames and have a dash mark denoted in the key frame column.
The 10th frame is the first instance of the B layer - which is B1. For this part, the animators decided to split out hair from the face, which leaves the face on the A layer and the hair on the B layer. You can see that the B1 frame has the key frame B1 as well. For this same frame, the A4 douga is used - which corresponds to the A2 key frame. The below table has the frame pieces (open them up in a new tab to see the full image):
| Frame | A Layer Key Animation | B Layer Key Animation | A Layer Douga | B Layer Douga |
| 1 | 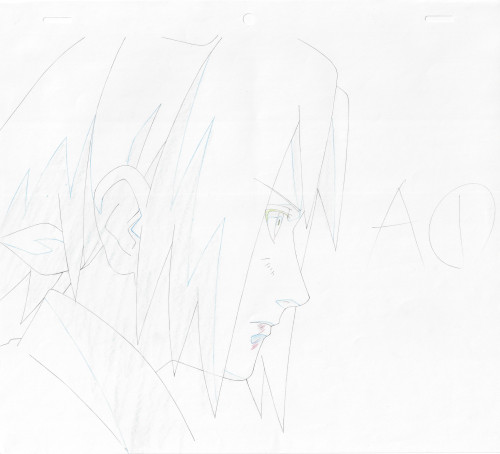 |
N/A | 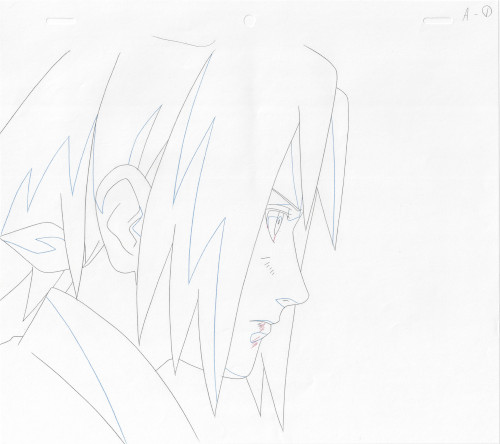 |
N/A |
| 4 | N/A | N/A | 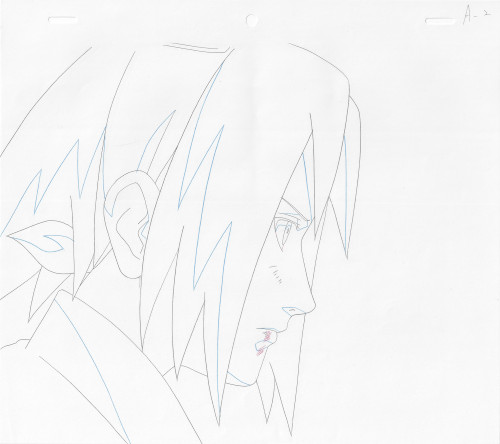 |
N/A |
| 7 | N/A | N/A | 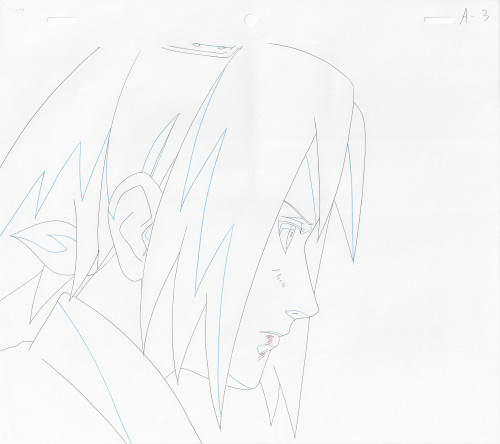 |
N/A |
| 10 | 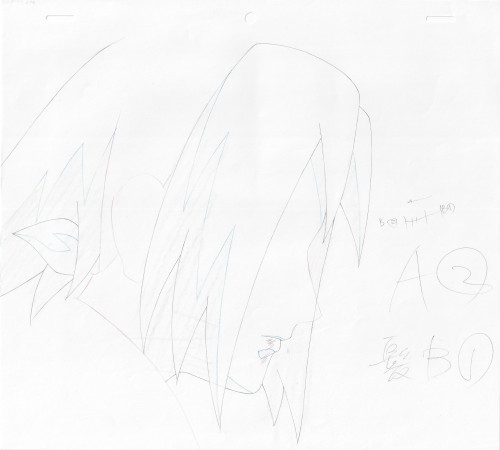 |
(same piece of genga as A layer) |
|
 |

It gets a little tougher because, as you can see, the A layer was actually split up further into 2 pieces. This is not something found in the timing sheet itself. The base face layer is labeled AA and the top of the douga has an indication to use it for the A4, A5, and A6 layers to make the whole A layer. Confusing! Sometimes this base layer is also labeled with a ' character (e.g. A' instead of AA).
The rest of the timing sheet is read in this manor. Each shot is the whole of the douga layers. The following table shows a selection of the frames:
| Frame | A Layer Key Animation | B Layer Key Animation | A Layer Douga | B Layer Douga |
| 25 | A3 | B2 | A5 | B5 |
| 40 | A2 | B2 | A4 | B5 |
| 76 | A4 | B2 | A6 | B5 |
| 112 | A2 | B2 | A4 | B5 |
| 148 | A4 | B2 | A6 | B5 |
Final thoughts about this example:
- Good example showing how douga gets reused to mimic speaking. Cels and douga do not always correspond 1:1 nor have linear numbering.
- Good example for showing 2 timesheets.
- Sometimes reading a timesheet needs some tough love and compassion to really understand it.
So that should do it! A lot was skipped at the end, but the principles should be the same. As an exercise, you are encouraged to read through the second example to get a good feel for it.
Putting it all Together
To put it all together, here is a video showing the making of Naruto the Movie 1, narrated by Kakashi himself!
Final Thoughts
So, I hope you learned a little bit about timing sheets and the animation process. Remember that timing sheets might need to be read differently for each one. You are looking at them after-the-fact instead of as an employee of the animation company at that point in time. If it is still confusing, do not worry - much like learning a jutsu, it takes time and practice. Seek out timing sheets for your favorite series and you will be a master in no time.
Thank you!
Framing, the right and wrong way to do it.
[This resource is in progress . Consider visiting this link for general guidance: https://www.framersworkshop.com/Animationcels/index.html]
General tips:
DO NOT use tape directly on your animation art pieces. This will cause damage such as "burns" to your art over time.
Please use UV blocking museum quality glass/plexiglass/acrylic to protect your art from UV damage.
Please do not place your framed art in direct sunlight as this will put your animation art at risk of UV damage.
You can buy any frame you'd like and replace the glass with UV blocking plexiglass such as from this site which sells custom cut UV blocking plexi-glass:
https://www.arttoframe.com/glass-for-picture-frames
or:
https://www.americanframe.com/products/uv-picture-framing-acrylic-aauv.aspx
Quick Guide to Types of Non-Production Animation Art / Cels
A question that comes up often is, " is this cel/sketch real ?" Most animation art collectors want to buy the art that was actually used to produce the image they see on screen of their favorite movie or show. This becomes tricky though because there is a large amount of unofficial and officially produced art that was created solely for collectible reasons and weren't actually used in production. While these things are still fun to collect they are typically less valuable than production art. Sometimes a seller may not know what they have or may purposely misrepresent/mislabel their items. Use this guide to familiarize yourself with the different types of non-production art out there.
Official Reproduction Cels / 複製
These cels very much resemble a regular cel. They are usually hand-painted on acetate and may have peg-holes and a sequence number. The background is usually a color print out. They were typically made for shows that were CGI so no actual cels were made for the show. Multiple copies of an image or frame were made so they usually aren't too hard to find. Studio Pierrot for example produced many reproduction cels for Naruto. You will often see these repro cels with a colored paper frame on top. Sometimes reproduction Hanken cels were also made. These are usually numbered i.e. 1/100 and made in a limited quantity.
Studio Pierrot Naruto Reproduction cel with green paper frame.
This is a limited edition silk-screened Ghibli Reproduction cel produced for their 30th Anniversary.
Rilezu / リレイズ
Rilezu are a type of reproduction cel but with one important difference. There is only ONE unique cel made from each frame. This makes them more rare and generally more expensive. Sometimes the rilezu may even come with the corresponding douga/genga it was based on.
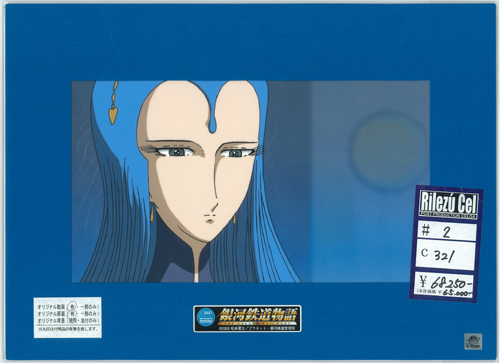
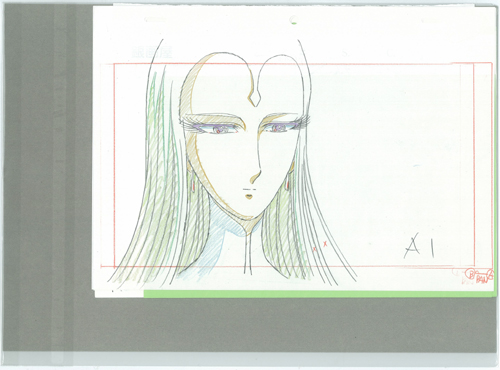

Example of a Rilezu that comes with it's matching genga and douga from the Anime World Star Shop.
Sericels/Chroma-cels
A sericel is a mass produced reproduction cel. They are typically copied/screen-printed rather than hand painted. They also come in non-standard sizes compared to standard production cels. Their quality usually varies and they are usually inexpensive. Ani-Magine Anime created and sold a selection of sericels advertised as "Chroma-cels"
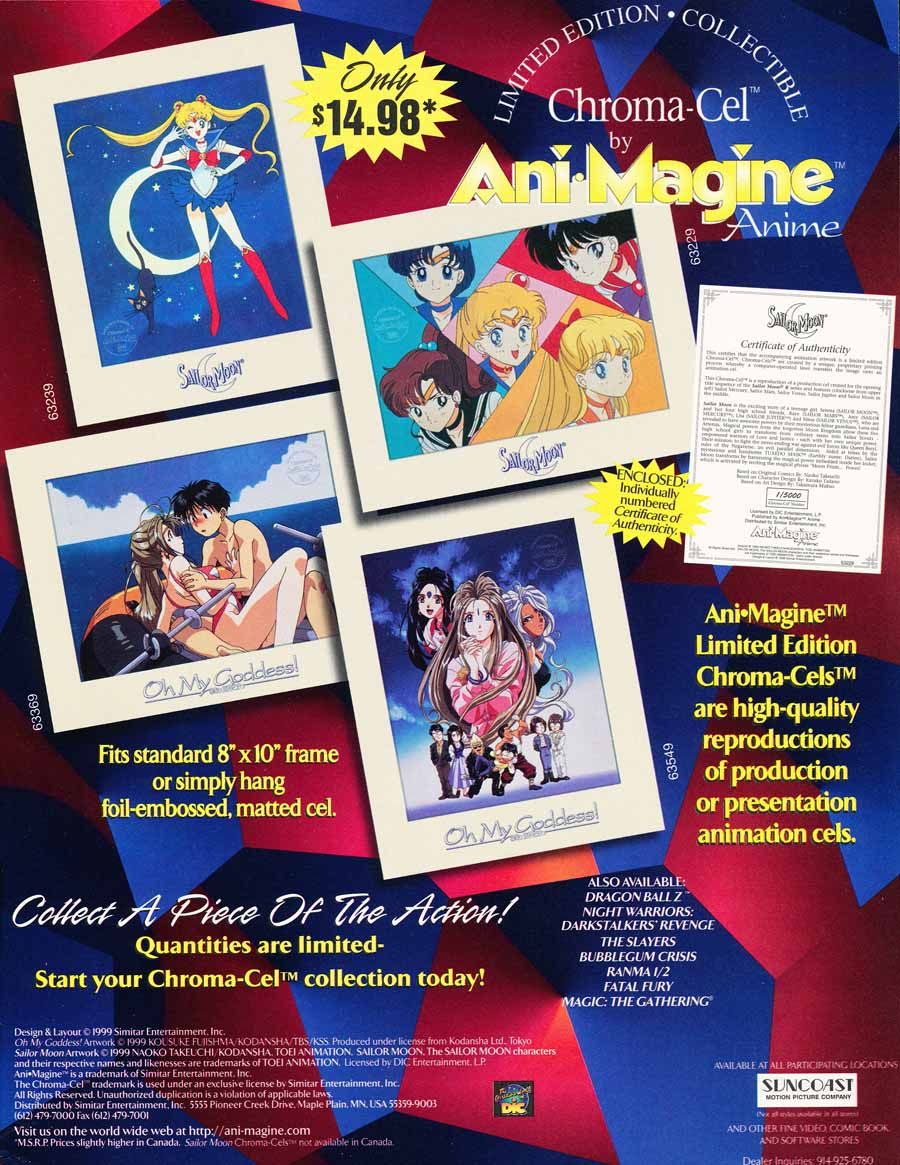
Ad for Chroma-Cels
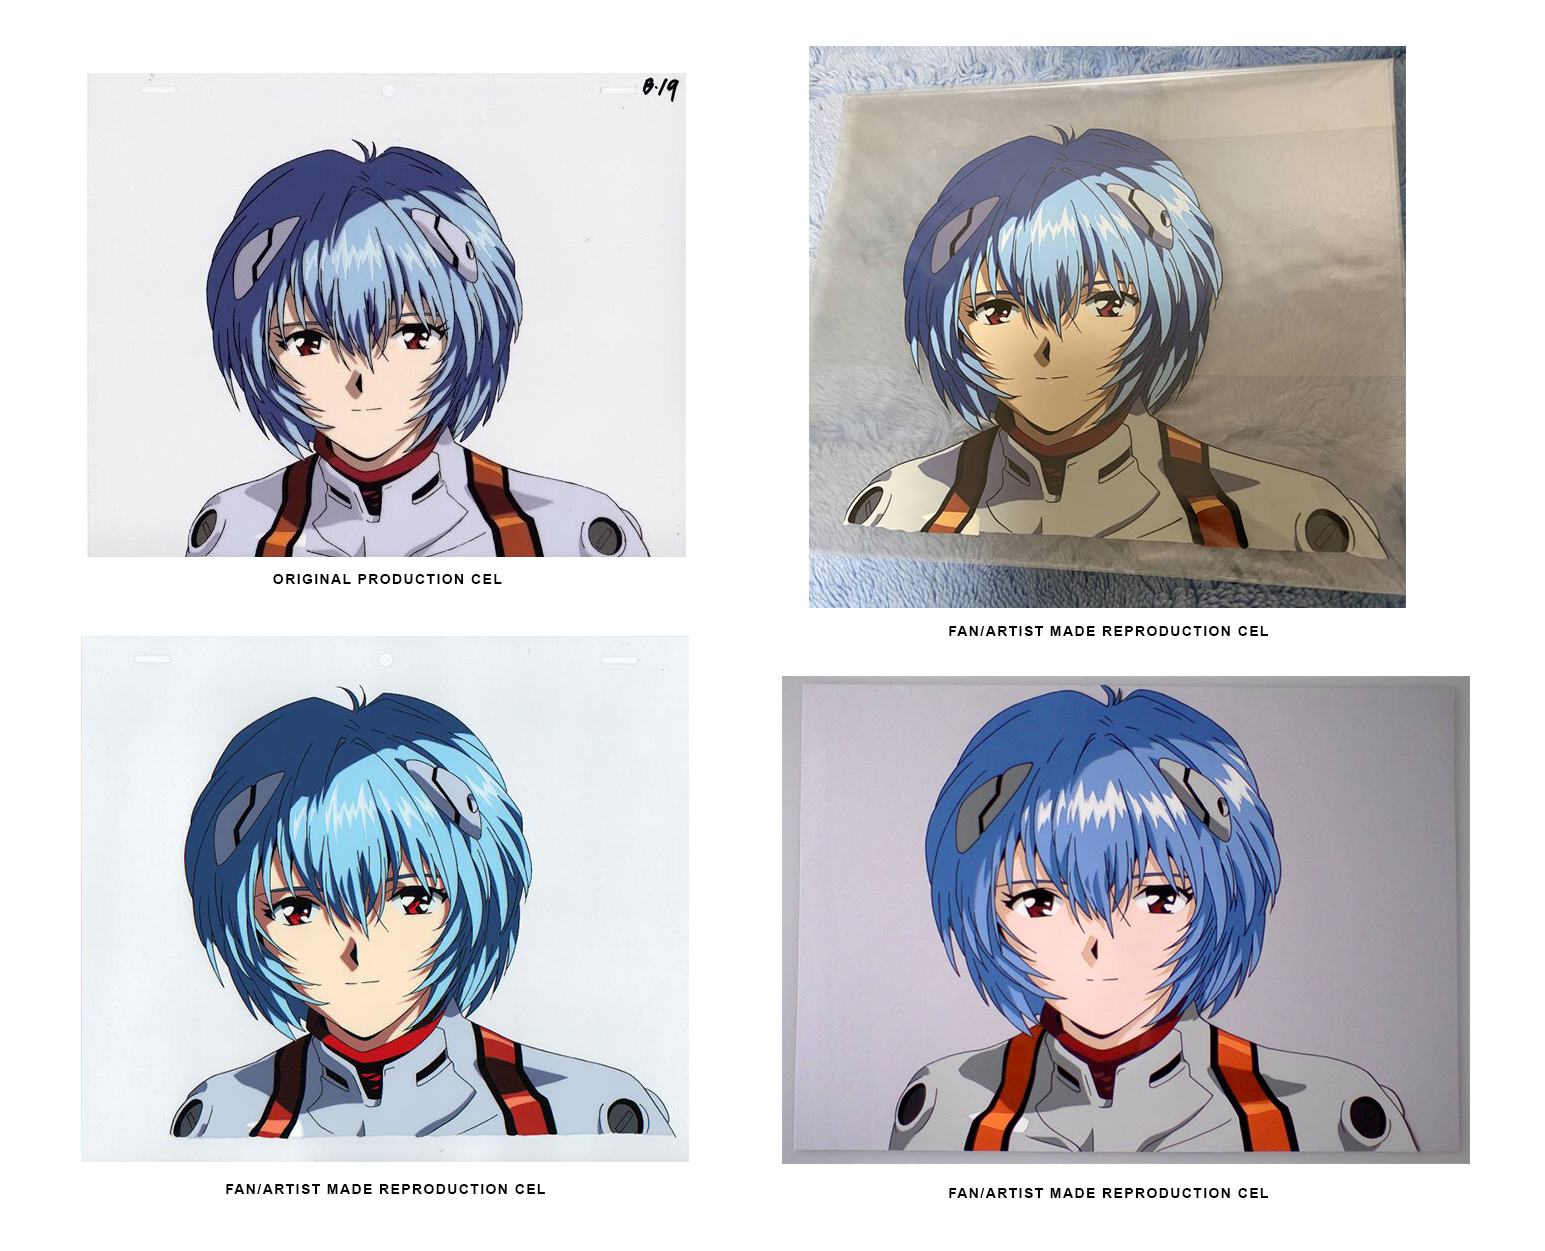
Fan-Made / Artist-Made / Doujin 同人 Cels
Fan-made cels are cels made by people with no affiliation to the original studios/artists. Production cels are one of kind and can be very expensive so some fans decide to make their own. They are usually hand inked and hand painted onto acetate/transparent plastic. Some images are so iconic they are copied repeatedly.

Screenshot of Rei from Evangelion
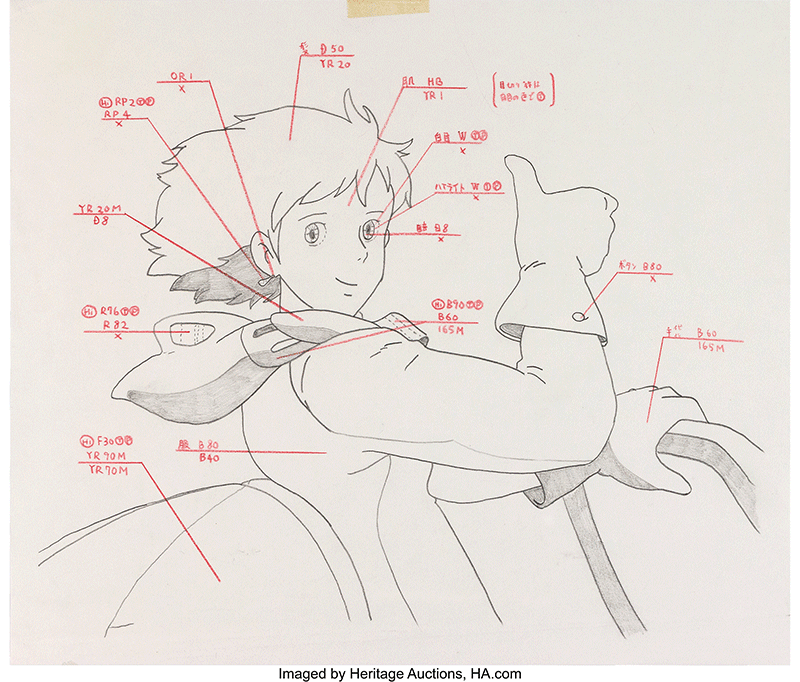
Official Copy Douga & Genga
Newer shows are all CGI based and studios are rarely releasing any official production art out for sale to the public. You may find copy douga and genga for sale in shops or available as Ichiban Kuji Lottery/一番くじ prizes. In some cases like Sailor Moon, sets of copy douga were sold as collectibles.
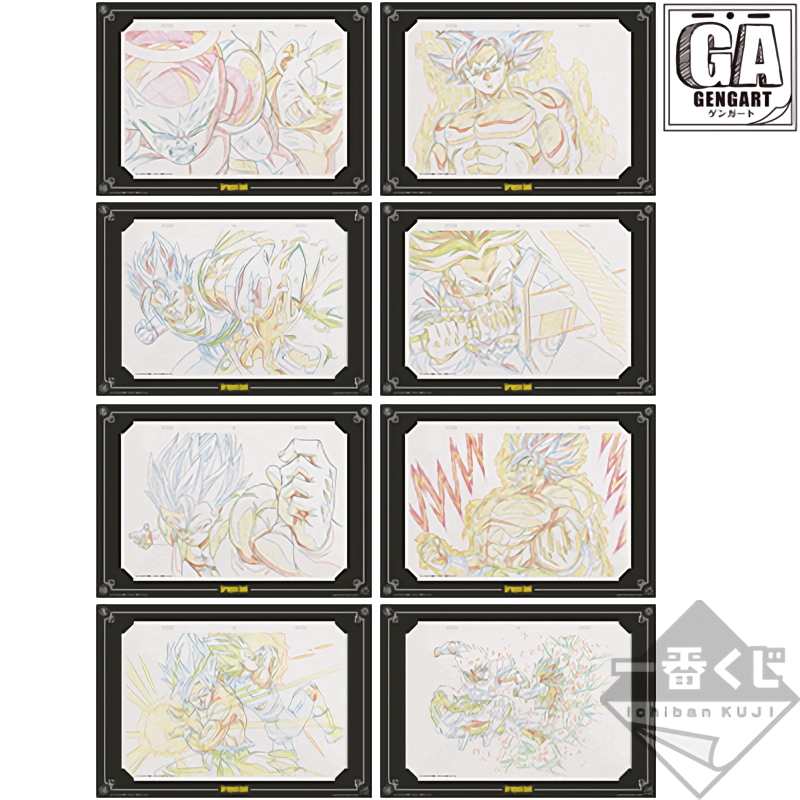
DragonBall copy genga from Ichiban Kuji Lottery
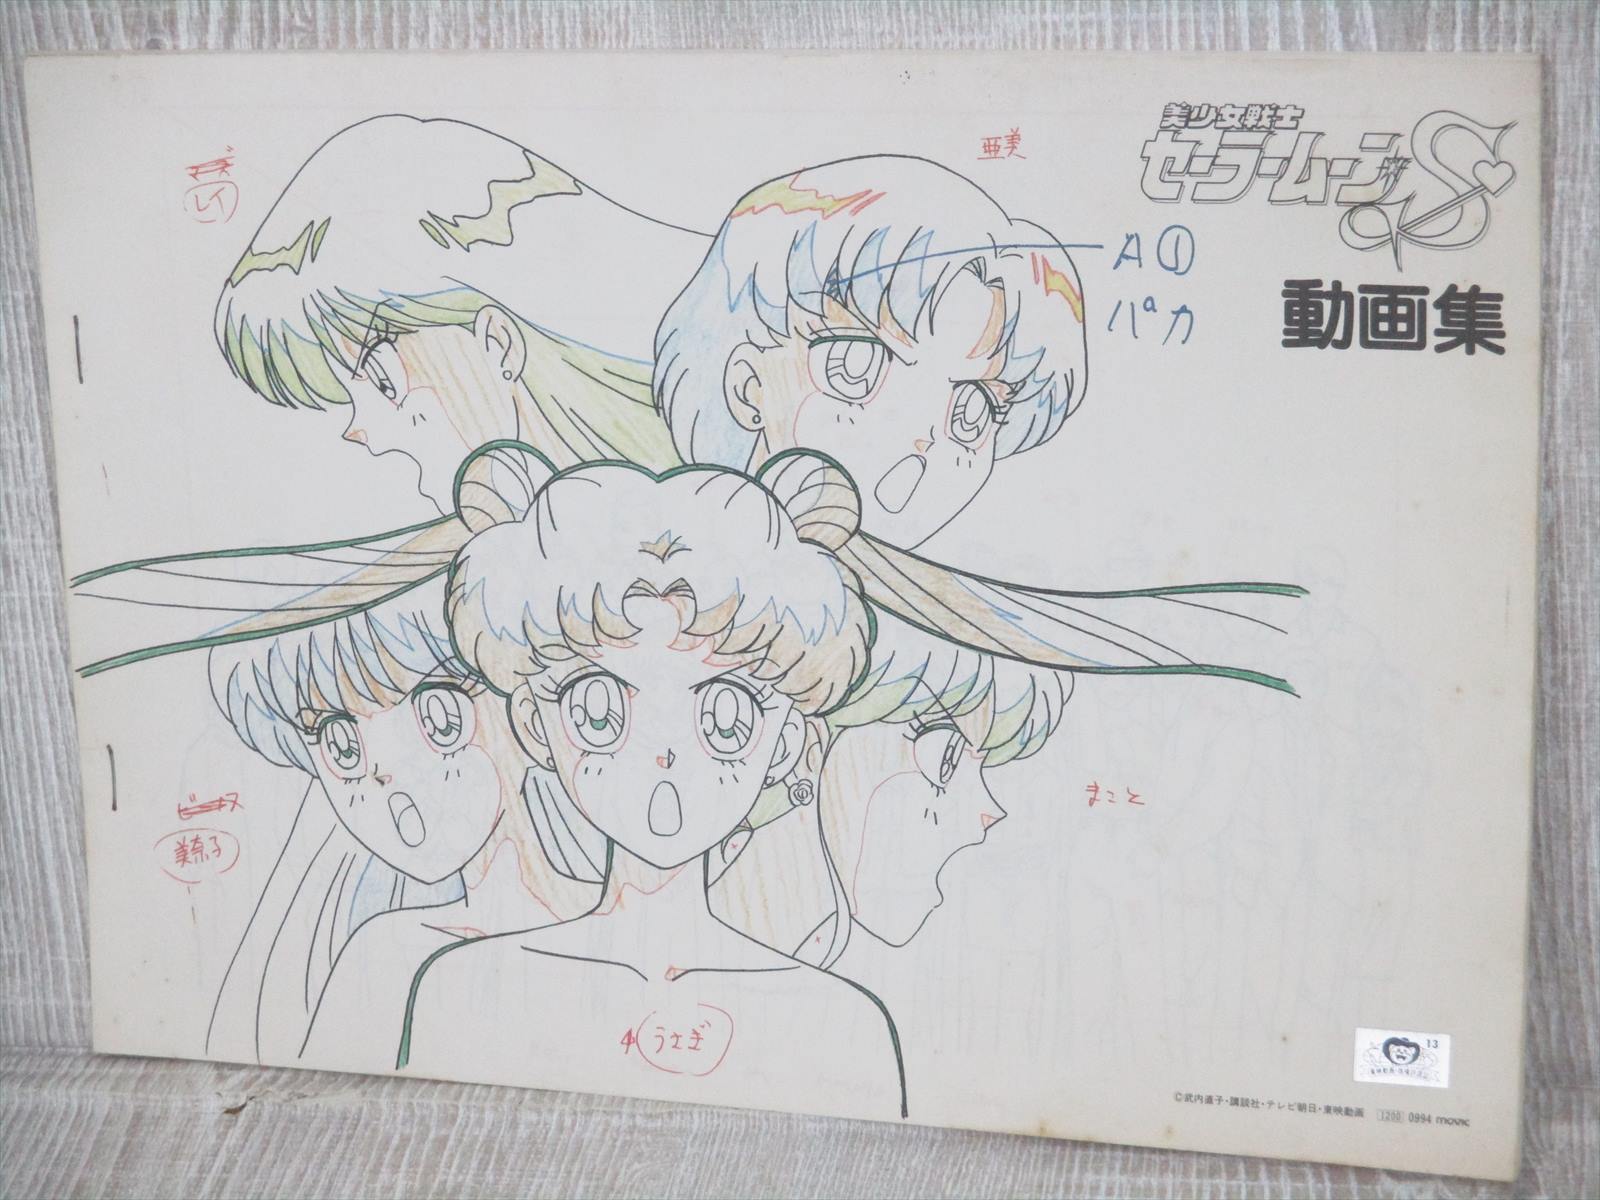
Sailor Moon Copy Douga Booklet
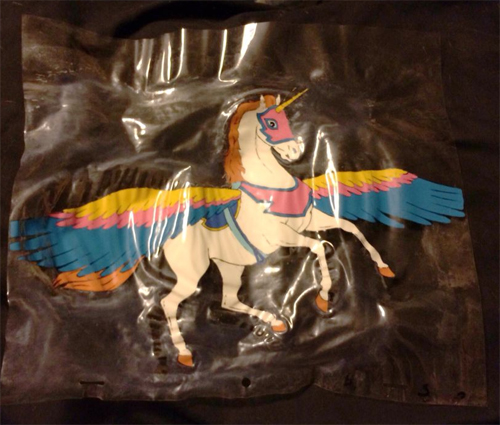
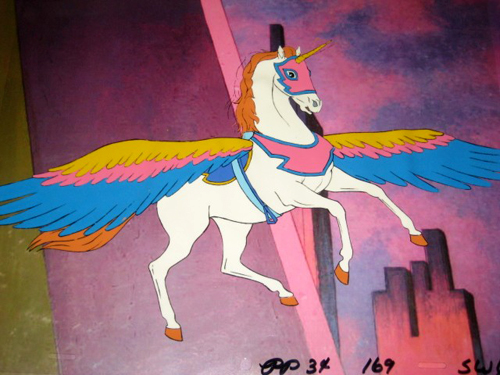
In the 80's/90's, Do it Yourself/DIY cel kits were released for fans to paints themselves. The lines came preprinted onto acetate and you could buy the paints separately and apply the paint according to the color guide.
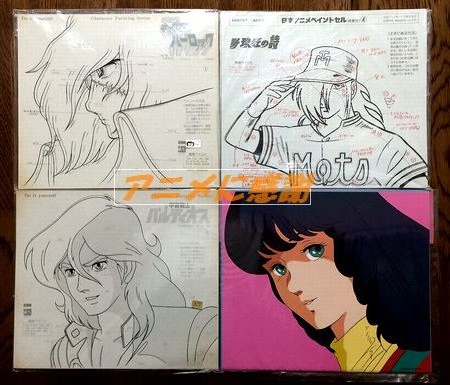 |
 |
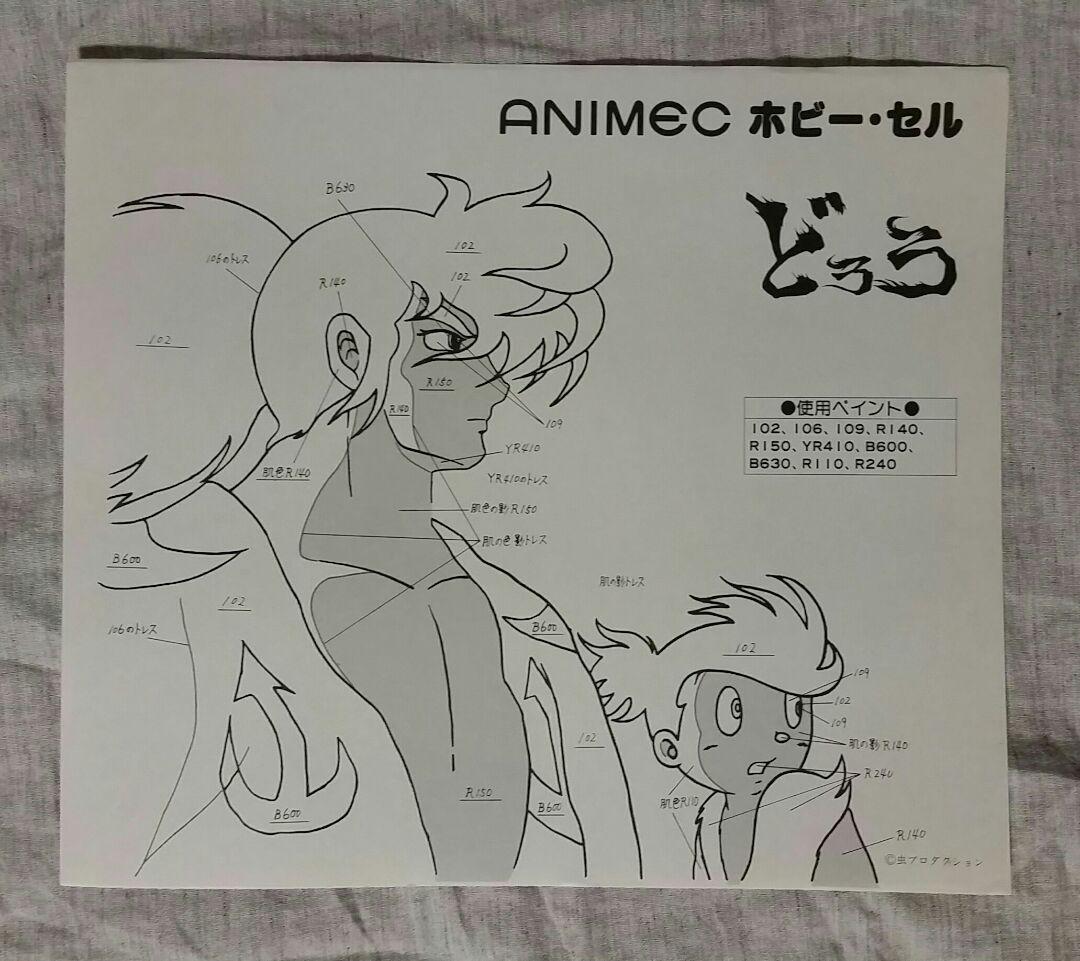 |
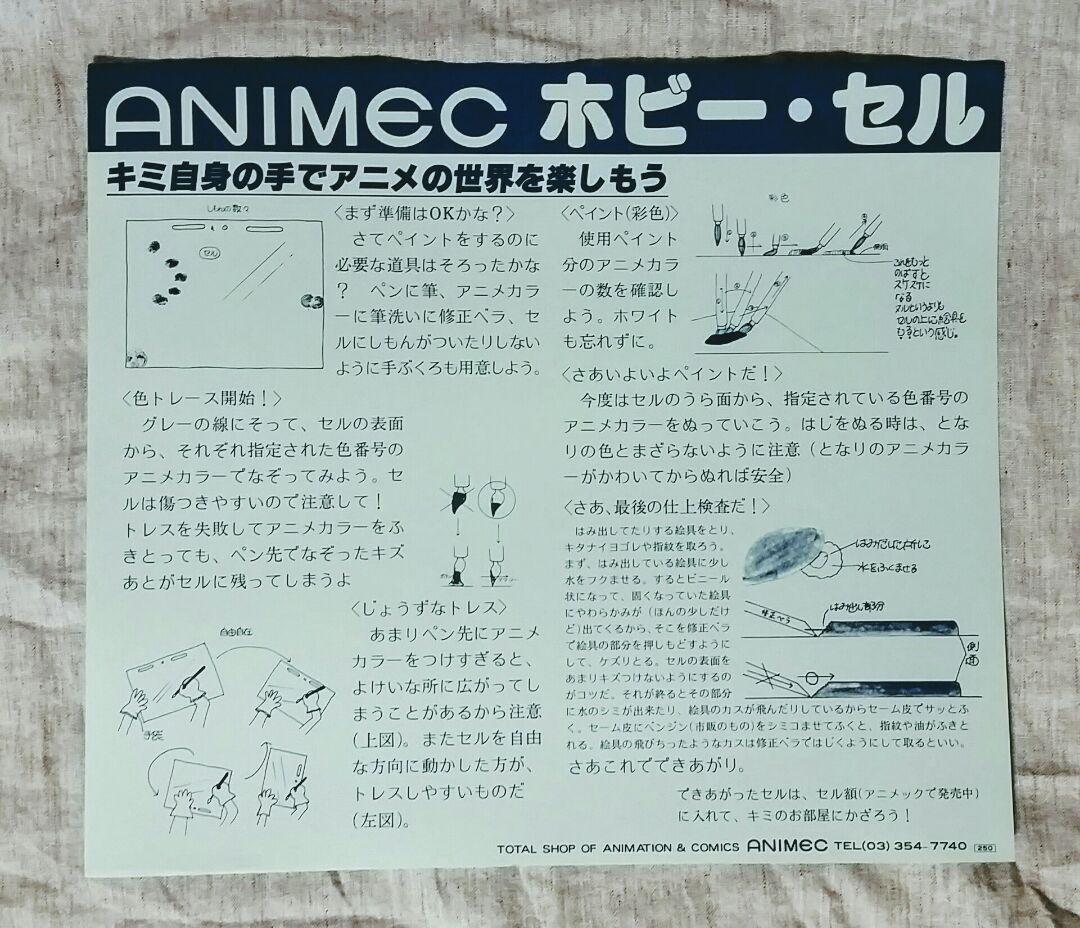 |
How to Spot a Fake
[This page is a work in progress]
To help demonstrate how to check if a cel or sketch is fake we will examine a few examples of fake animation artwork in detail below.
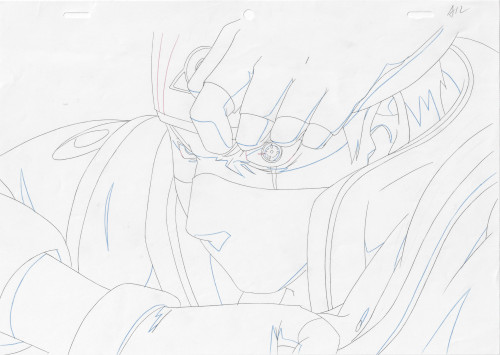
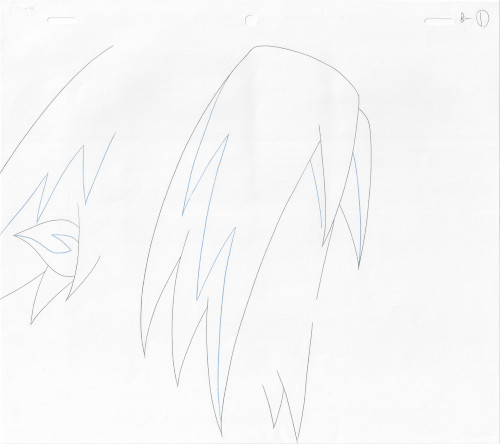
Exhibit 1: A fake Nausicaä sketch
Here is douga which claims to be from Nausicaä of the Valley of the Wind. Ghibli artwork is highly sought after and fetches high prices so it's a prime target for counterfeits. One of the easiest way to confirm if the art is fake is to take a screenshot of the matching scene and overlay it over the cel/sketch and do what some call the "flicker test" by turning the layers on and off quickly to check for inconsistencies.
Even before doing the flicker test there are a few red flags about this douga.
1. it is the wrong dimensions
2. there are no peg holes
3. the shading indicating shadows is done in graphite here but is usually done with colored pencils
4. there are paint colors marked in red pencil all over the sketch. You can see paint colors marked on douga occasionally but I've never seen it done on Ghibli art. The amount of paint indicators is more reminiscent of DIY cel painting kit instructions.
5. overall the pencil line quality is quite wobbly and not indicative of an experienced artist's hand
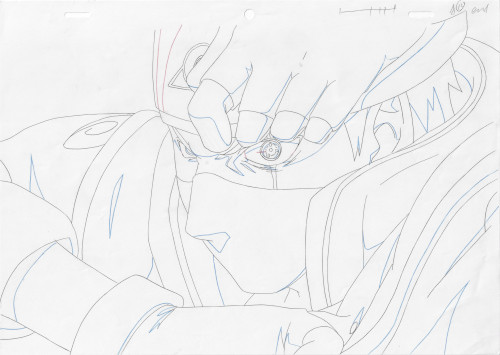
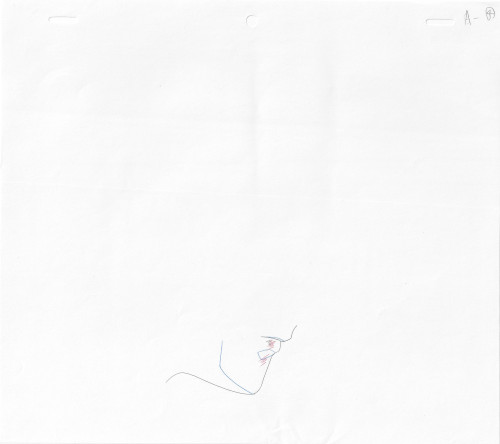
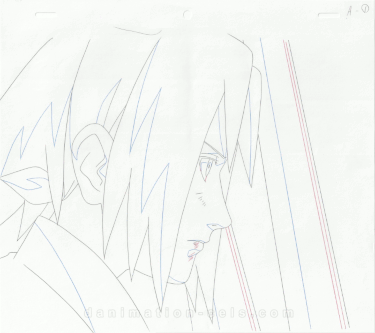
I was able to find an image of the actual cel from the scene as well so I applied the flicker test here using the cel this time to do the comparison.

In both cases there are several areas where the douga does not match the screencap or the cel. I have drawn in red several places where the sketch does not match the references in the video below.
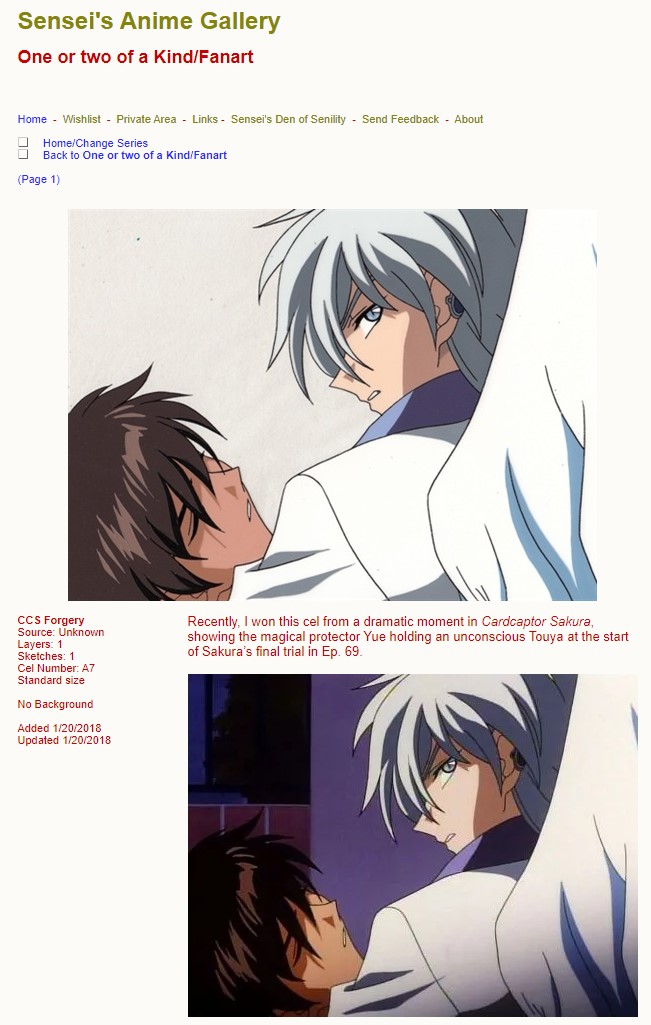
The examples shown above have fairly obvious mistakes that make them easy to spot. If you want a look at a very sophisticated fake please visit Sensei's Cel Gallery where he goes into great depth into how he discovered one of his Card Captor Sakura cel/dougas is a forgery. http://sensei.rubberslug.com/gallery/inv_info.asp?ItemID=415988
Disclaimer: If you own any of these images and want them removed please contact us.